
This post originally appeared on Medium here.
I teach database fundamentals and Node.js at HackYourFuture. We’re only physically together with our students for four hours a week, and many of us instructors keep different hours from our students. So when a student (or, let’s face it, me) inevitably does something… “undesirable” to his or her database, there can be a big delay between the error and getting an instructor to reset the database.
Developing against databases requires mistakes. The faster you can make those mistakes, recover, and try again, the faster you can get your code complete and your problems solved. We want our students to make these mistakes with us, because it’s a safe environment. However, they need to be able to recover from those mistakes quickly.
So we built a self-service database reset tool for our students to use. Since the HackYourFuture team already uses Slack, we figured a slash command would be the easiest way to go. Read on to see how we did it and how to build your own.
Prerequisites
Before getting started, make sure you have access to the following:
- An Amazon Web Services (AWS) account
- A relational database running somewhere (if you don’t have one, check out the Amazon Relational Database Service (RDS) on AWS)
- Node.js 6.10 or higher
- The serverless framework installed
- Membership to a Slack team with the ability to create applications
Creating your Function
Let’s give ourselves a new function to call.
$ sls create --template aws-nodejs
This automatically creates three files for us: handler.js, which contains a skeleton for our lambda function, serverless.yml, which is a template for all the deployable resources, and a .gitignore customized for the serverless framework.
Default versions
handler.js
"use strict";

module.exports.hello = (event, context, callback) => {
  const response = {
    statusCode: 200,
    body: JSON.stringify({
      message: "Go Serverless v1.0! Your function executed successfully!",
      input: event
    })
  };

  callback(null, response);
};
serverless.yml
service: aws-nodejs # NOTE: update this with your service name

provider:
  name: aws
  runtime: nodejs6.10

functions:
  hello:
handler: handler.hello
I’ve removed all the comments from serverless.yml (there are a lot) but if it’s your first time using the framework go ahead and read through them. There’s a lot of functionality in there that we won’t be covering in this post.
Parsing the Slack request
AWS Lambda gives us all the necessary information from the incoming request in the event parameter to our function. All of the Slack App information is in event.body, but it’s worth checking out the other fields in the object.
Slack Apps POST their data as HTTP Form bodies, not JSON. This means we need to run it through querystring.parse before accessing any of the fields. In our case, we’re interested in getting the requesting user’s username, so we parse and break out Slack’s user_name field from the event.body like so:
let querystring = require('querystring');
...
const requestingUser = querystring.parse(event.body).user_name;
Querystring is a Node.js built-in API function, so we don’t need to involve ourselves with npm or a package.json file…
Setting up the MySQL connection
MySQL, on the other hand, is not a built-in. So let’s go ahead and set it up.
$ npm init && npm install --save mysql
This will make our packaged function a little bigger, but the serverless framework does a good job of handling the deployment for us, so this doesn’t really add any meaningful complexity for us as developers.
Now that we have access to MySQL, let’s setup our connection:
let mysql = require('mysql');
...
const connection = mysql.createConnection({
  host: "somedatabasehost.com",
  user: "someuser",
  password: "somepassword",
  multipleStatements: true
});
...
connection.connect();
Executing the query
We’ll need to load in our reset query and attempt to execute it. In our case, We’ve placed a file resetdata.sql in the root directory alongside handler.js and serverless.yml. We also want to make sure we’re using the requesting user’s database and not another student’s, so we make a compound query (this is why we included the multipleStatements: true key-value pair in the connection options).
Execute the query and handle the response in a callback. As always, the first thing we do is release the connection:
let fs = require('fs');
...
const resetScript = fs.readFileSync("resetdata.sql");
const query = `USE ${requestingUser}; ${resetScript}`;
...
connection.query(query, function (error, results, fields) {
connection.end();
Sending the response
Now all we have to do is form our response and send it back via the callback!
const response = {
  statusCode: 200,
  body: JSON.stringify({
    text: `Hi, ${requestingUser}.\nYour database has been reset!`
  })
};
callback(null, response);
Of course, we haven’t handled any errors here, which you should always do.
“Final” version of handler.js
That’s it for our function! Of course, you have to match all those pieces together, which gives us the following:
"use strict";

let fs = require("fs");
let mysql = require("mysql");
let querystring = require("querystring");

module.exports.reset = (event, context, callback) => {
  // Extract the Slack username
  const requestingUser = querystring.parse(event.body).user_name;

  // Setup the MySQL connection
  const connection = mysql.createConnection({
    host: "somedatabasehost.com",
    user: "someuser",
    password: "somepassword",
    multipleStatements: true
  });

  // Load in the reset script
  const resetScript = fs.readFileSync("resetdata.sql");

  // Execute the reset script
  const query = `USE ${requestingUser}; ${resetScript}`;

  connection.connect();
  connection.query(query, function(error, results, fields) {
    connection.end();

    const response = {
      statusCode: 200,
      body: JSON.stringify({
        text: `Hi, ${requestingUser}.\nYour database has been reset!`
      })
    };
    callback(null, response);
  });
};
Of course, we’ve left out a lot of our actual code here. You’ll need to handle the database secrets, a decidedly non-trivial task. You’ll also need to handle parsing, authorization, and authentication, which our deployed function does, but that’s way beyond the scope of this tutorial.
Note that we renamed the function from “hello” to “reset”. We’ll need to update our function definition in serverless.yml to match.
Deploying your Function
API Gateway
We’ll need a way for Slack to invoke our function. The serverless framework calls these “events,” and the simplest case for us is to build an API Gateway endpoint that the slash command can send an HTTP POST request to.
API Gateway can get … let’s say, “complex,” but the serverless framework abstracts that away for us. All we need to do is add an http event to our function declaration in serverless.yml. The serverless framework will handle everything else, and output the generated endpoint for us to use in Slack.
Final version of serverless.yml
From previous executions, we know that this function only uses around 20 to 26MB of RAM, so we’ve set the memorySize parameter to be 128 (MB), the smallest allowed value. We also renamed the function and its “handler” parameter from “hello” to “reset” and from “handler.hello” to “handler.reset” respectively, just as we did in handler.js.
The serverless framework deploys to the us-east-1 (Northern Virginia) region by default. Deploying to another region is as simple as adding a “region” key-value pair to the “provider” object, in our case, “eu-central-1” (Frankfurt).
service: dbreset

provider:
  name: aws
  runtime: nodejs6.10
  region: eu-central-1

functions:
  reset:
    handler: handler.reset
    memorySize: 128
    events:
      - http:
          path: reset
method: post
Now it’s a single line to deploy our updated function, the implicit API Gateway, and all the other required resources.
$ sls deploy
Simple! Be sure to save that URL that the framework spits out under “endpoints”; we’re going to need it in a minute.
Connecting your Function to Slack
Go to the Slack API page, click on “Your Apps” in the upper right corner, and click the “Create New App” button to get started.
Enter a name for your app, and make sure you have the correct team selected in the “Development Slack Workspace” dropdown. Click Create App, and off we go!

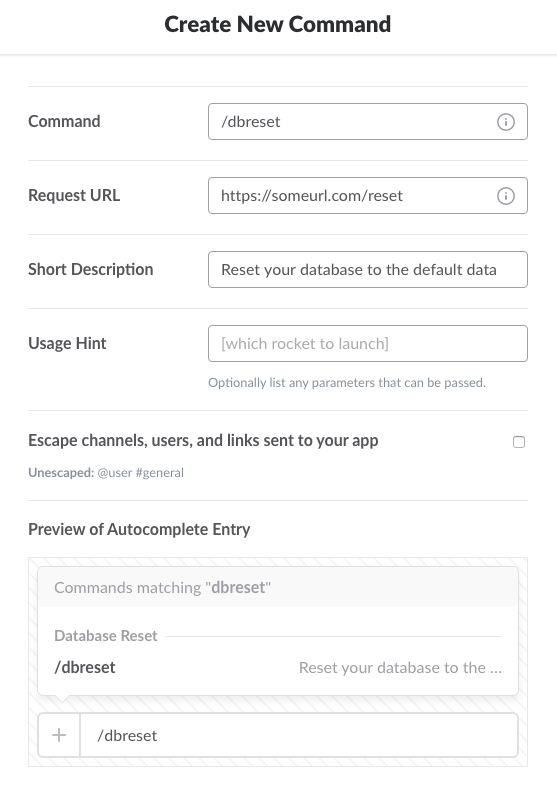
On the “Basic Information” screen that appears, click the “Slash Commands” box to enable a slash command for our app. On the “Slash Commands” screen that appears, click “Create New Command”, paste the URL provided as output from sls deploy into the “Request URL” textbox, and complete the remaining fields. Do not select the “Escape channels, users, and links sent to your app” checkbox.
Click the “Save” button (waaaaay down there on the bottom right), and you’ll be taken back to the app page. Click “Install App” underneath “Settings” in the menu on the left, and click the “Install App to Workspace” button that appears. You’ll be asked to grant permissions to your app; click “Authorize.” Slack will send you a confirmation email, take you back to your app settings page, and show you a “Success!” message and an OAuth Token.
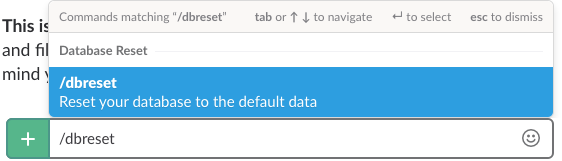
Now all we have to do is type /dbreset in any channel in Slack, and we get our tooltip:
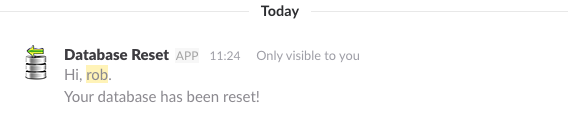
Hit enter, and we get our response.
Woohoo! Now we can DELETE FROM and TRUNCATE TABLE to our hearts’ content without worrying about finding someone to reset our development database for us. Freedom!
Extending the Function(s)
Not quite your use case? Interested in doing more? Why not implement the following:
- Add more commands, e.g.,
/dbreset <username>for instructors - Connect to HipChat or Microsoft Teams
- Use a queue such as Amazon Simple Queue Service (SQS) to route to different commands or stored procedures
- Implement more fine-grained user permissions via a user pool in Amazon Cognito or an Identity as a Service provider like Auth0.
Wrapup
If you’ve read this far, thank you! Hopefully you now have a better idea of the ease of use of the serverless framework and the possibilities it offers.
Do you use the serverless framework or another FaaS model for ChatOps? What extensions would you like to see? Let me know in the comments.